2006-04-26

실습 - JPEG 변환

PNG, GIF, TIFF 등의 이미지 파일을 drag & drop으로 JPEG로 바꿔주는 droplet을 만들어봤습니다. 스크립트를 조금만 바꿔주면 다른 포맷으로도 쉽게 바꿀 수 있습니다. 비슷한 기능을 하는 프로그램들이 많이 있겠지만, 애플스크립트로도 할 수 있다는 것을 보여주기 위해 만들어봤습니다. 데스크탑이나 독에 위치시키면 쓸만할 것 같습니다.
on open theseFiles
-- droplet으로 만들기 위해 on open으로 시작합니다.
set thisPath to ((path to desktop folder) as string) & "iPotato:" as string
-- 변환된 파일이 저장될 경로입니다.
tell application "Finder"
if thisPath exists then
else
make new folder with properties {name:"iPotato", location:(path to desktop folder)}
end if
end tell
-- 해당 경로에 폴더가 있는지 확인한 후, 없으면 만듭니다.

tell application "Image Events"
repeat with thisFile in theseFiles
-- drag & drop 된 파일이 여러 개일 경우 repeat으로 하나씩 처리합니다.
set thisImage to open thisFile
-- 해당 파일을 Image Events가 처리할 수 있는 image class로 만듭니다.
save thisImage as JPEG in thisPath
-- 지정된 경로에 JPEG로 저장합니다. JPEG 대신 다른 이미지 유형을 적용할 수 있습니다.
close thisImage
-- 작업을 마쳤기 때문에 image를 닫습니다. 굳이 닫지 않아도 스크립트가 종료되면 시스템 메모리에서 사라지게 되지만, (미래를 위해) 닫아주는 것이 좋다고 생각합니다.
end repeat
end tell
end open


주석으로 언급한 image를 닫는 문제는 공부를 더 해야 명확한 설명이 가능할 것 같습니다. file을 읽거나 쓸 때에도 마찬가지로 만들어진 file class를 닫아주는 것이 좋습니다. 스크립트의 길이가 길어질 때 같은 이름의 변수가 사용될 수도 있기 때문일 것 같기도 하고, 만들어진 file이나 image의 크기가 매우 크다면 스크립트가 끝나기 전까지 메모리를 불필요하게 차지하고 있을 수도 있기 때문인 것 같기도 합니다.

2006-04-25

실습 - 데스크탑 파일 정리

애플포럼에서 바탕화면 정리용 스크립트, Tidy-It라는 글을 읽고서, 비슷한 것을 만들어보고 싶어졌습니다. 따라서 만든 것이기 때문에 독창성을 주장할 여지는 없어보입니다. 이번 실습 역시 이런 것이 이런 식으로 가능하다는 것을 보이는 데에 의의가 있습니다.
각각의 확장자들의 목록을 먼저 만듭니다. 변수에 대해서 설명할 때 나왔지만, property로 선언한 변수는 스크립트 전체에서 어디에서 불러낼 수 있는, 가장 범위가 넓은 전역 변수입니다. Finder의 애플스크립트에 대해서는 아직 강좌를 구성하지 못했는데 자꾸 나오고 있습니다만, 이해하는 데에 큰 어려움은 없을 것 같습니다.
on open으로 시작하는 스크립트를 응용프로그램으로 저장하면 drag & drop으로 실행되는 droplet이 됩니다. 개별 파일들의 저장 경로를 확인해서 없으면 해당 폴더를 만듭니다. 경로는 취향대로 바꿀 수 있습니다.
property imageExtensions : {"jpg", "jpeg", "gif", "png", "tiff", "bmp", "pic", "pict"}
property multimediaExtensions : {"mp3", "m4a", "aac", "mov", "avi", "mpg", "mpeg"}
property documentExtensions : {"txt", "doc", "pdf"}
property compressExtensions : {"zip", "sit", "sitx", "rar", "tar", "gz"}
-- 필요한 확장자를 추가할 수 있습니다.

property myPath : alias (((path to desktop folder) as string) & "iPotato:")
property imagePath : (myPath as string) & "image:" as alias
property multimediaPath : (myPath as string) & "multimedia:" as alias
property documentPath : (myPath as string) & "document:" as alias
property compressPath : (myPath as string) & "compress:" as alias
-- 저장 경로는 임의대로 바꿀 수 있습니다.

on open theseFiles
-- droplet으로 만들기 위해 on open으로 시작했습니다.
try
tell application "Finder"
if myPath exists then
if imagePath exists then
else
make new folder at myPath with properties {name:"image"}
end if

if multimediaPath exists then
else
make new folder at myPath with properties {name:"multimedia"}
end if

if documentPath exists then
else
make new folder at myPath with properties {name:"document"}
end if

if compressPath exists then
else
make new folder at myPath with properties {name:"compress"}
end if
else
make new folder with properties {name:"iPotato", path:path to desktop folder}
end if

repeat with thisFile in theseFiles
set thisExtension to name extension of (info for thisFile)
-- 확장자만 가져옵니다.

-- 각각의 리스트에 일치하는 확장자가 있는지 검사한 후, 있다면 지정된 폴더로 옮깁니다.
if thisExtension is in the imageExtensions then
move thisFile to imagePath
else if thisExtension is in the multimediaExtensions then
move thisFile to multimediaPath
else if thisExtension is in the documentExtensions then
move thisFile to documentPath
else if thisExtension is in the compressExtensions then
move thisFile to compressPath
end if
end repeat
end tell
on error errMsg
display dialog errMsg
end try
end open

실습 - iTunes 제목, 앨범 정리 (대소문자 처리)

갖고 있는 CD에서 MP3로 추출한다거나, 친구들에게 선물을 받는 등 다양한 경로로 MP3 등의 음원을 보유하게 됩니다. 일부 음원은 ID3 tag에 맞춰 깔끔하게 정리되어 있기도 하고, 또 어떤 음원은 영어로 된 제목과 앨범이 전부 소문자로 되어 있거나 반대로 대문자로만 되어있는 경우도 있습니다. 갖고 있는 음원의 수가 많지 않다면 일일이 손으로 고칠 수도 있지만, 그 수가 매우 많다면 곤란해집니다.
이런 경우를 위해 다양한 유틸리티들이 개발되어 있지만, 이 블로그의 실습 코너들이 그렇듯이 실용성보다는 애플스크립트로도 가능하다는 것을 보이기 위해 iTunes에 등록된 음원의 제목과 앨범을 정리하는 스크립트를 짜보겠습니다.
iTunes에서 선택된 음원들만을 대상으로 정리 작업을 수행합니다. 자주 사용하실 것 같다면 스크립트 편집기에서 응용프로그램 포맷으로 저장하면 편리하게 쓰실 수 있을 것입니다. 소문자로 처리해야 하는 전치사, 접속사 등의 목록과 대문자로 표시해야 하는 목록 등은 직접 추가하거나 수정하실 수 있습니다.
property theCheckList : {"a", "after", "against", "an", "and", "at", "before", "but", "by", "down", "for", "from", "in", "into", "of", "on", "or", "under", "up", "upon", "the", "to", "with"}
-- 소문자로 표시될 전치사, 접속사, 관사의 목록입니다.
property theUpperList : {"(CD)", "CD", "UK", "BBC", "U.S.S.R.", "EP", "ABBA", "DNC:", "A.M.", "P.M."}
-- 대문자로 나타내야 할 단어들의 목록입니다.
property theSkipList : {"Mercedes-Benz"}
-- 대소문자 처리가 필요없는 단어들의 목록입니다.

try
tell application "iTunes"
set theseTracks to the selection of browser window 1
-- 현재 선택된 음원의 목록을 list로 가져옵니다.
if theseTracks is {} then error "선택된 트랙이 없습니다."
-- 선택된 음원이 하나도 없을 경우 나타낼 문장입니다.

repeat with thisTrack in theseTracks
set thisName to (name of thisTrack) as Unicode text
set thisAlbum to (album of thisTrack) as Unicode text

tell me
-- 일부 AppleScript의 기능이 iTunes 내부적으로 지원이 안되는 것 같습니다. 스크립트 편집기 혹은 컴파일될 응용프로그램에서 처리하도록 했습니다.
set newName to thisName as Unicode text
-- 제목입니다.
set newAlbum to thisAlbum as Unicode text
-- 앨범입니다.

if thisName is not "" then
set newName to orthographize(thisName)
end if

if thisAlbum is not "" then
set newAlbum to orthographize(thisAlbum)
end if
-- 제목이나 앨범이 비어있지 않은 경우에만 계속 진행합니다.
end tell

considering case
-- considering을 사용할 기회가 왔습니다. 애플스크립트에서 apple과 Apple을 같은 것으로 인식하기 때문에, 대소문자를 구별하라고 기별을 넣습니다.
if thisName is not newName then
--display dialog (thisName & " / " & newName) as string
-- iTunes에서 제대로 변환되는지 미리 테스트하려면 display dialog를 활성화시킵니다.(주석을 제거)
set the name of thisTrack to newName
-- iTunes에서는 undo가 되지 않기 때문에 display dialog를 이용해 테스트하실 때에는 이 줄의 스크립트는 주석처리하십시오. 아래 앨범의 경우도 마찬가지 입니다.
end if

if thisAlbum is not newAlbum then
--display dialog (thisAlbum & " / " & newAlbum) as string
set the album of thisTrack to newAlbum
end if
end considering
end repeat

beep
-- 작업이 완료되면 소리로 알려줍니다.
end tell

on error errMsg number errNum
log (errNum & " : " & errMsg) as string
end try

on orthographize(thisText)
-- 대소문자 처리를 담당한 핸들러입니다.
set oldDelimiter to AppleScript's text item delimiters
set AppleScript's text item delimiters to space
-- 문자열 내부의 구분을 공백(space)로 합니다. 기본값이 space이지만 혹시 다른 것으로 지정되어 있을 수도 있기 때문에 작업 완료 후 원상복구를 위해 oldDelimiter에 저장해놓습니다.

try
set theseWords to every text item of thisText as list
-- 단어들을 list에 담습니다.
set newText to ""
-- 대소문자 처리가 완료된 제목과 앨범 정보가 담길 변수입니다.

repeat with m from 1 to (count of items of theseWords)
set thisWord to item m of theseWords
set newWord to ""

if theCheckList contains thisWord then
-- 소문자 목록에 들어있는 경우입니다.
if m is 1 then
-- 첫번째 단어라면 첫글자는 대문자로 만듭니다.
set theseCharacters to every character of thisWord
set newWord to changeCase(first item of theseCharacters, 1)

repeat with n from 2 to (count of items of theseCharacters)
-- 나머지 글자는 소문자로 바꿉니다.
set newWord to (newWord & changeCase((item n of theseCharacters), 0)) as string
end repeat
else
set newWord to changeCase(thisWord, 0)
end if
else
-- 소문자로 바꿀 필요가 없는 단어의 경우입니다.
if thisWord is in theUpperList then
-- 대문자로 만들어야 하는 경우입니다.
set newWord to changeCase(thisWord, 1)

else if thisWord is in theSkipList then
-- 처리할 필요가 없는 경우입니다.
set newWord to thisWord

else
-- 일반적인 경우입니다. 첫글자는 대문자이고 나머지는 소문자입니다.
set theseCharacters to every character of thisWord

set newWord to ""
set theFirst to 1
set theSecond to 2

if first item of theseCharacters is in {"(", "\""} then
-- ()나 ""로 둘러쌓인 경우입니다.
set newWord to first item of theseCharacters
set theFirst to 2
set theSecond to 3
end if

set newWord to (newWord & changeCase(item theFirst of theseCharacters, 1)) as string

repeat with n from theSecond to (count of items of theseCharacters)
set newWord to (newWord & changeCase((item n of theseCharacters), 0)) as string
end repeat
end if
end if

set newText to (newText & newWord & space) as string

end repeat
on error errMsg number errNum
log ("error on orthographizing : " & errMsg) as string
end try

set AppleScript's text item delimiters to oldDelimiter
set finalText to trim(newText)
-- 단어들을 합치는 과정에서 마지막에 공백이 포함됩니다. 이 공백을 제거하기 위한 핸들러입니다.

return finalText
end orthographize

on trim(theText)
set trimmedText to ""

if (ASCII number (last character of theText)) is 32 then
-- 공백의 ascii number가 32입니다.
set n to 1
repeat with c in (every character of theText)
-- 마지막 글자만 제외하고 한글자씩 합치는 방식입니다.
set trimmedText to (trimmedText & c) as string

if n is (count of items of every character of theText) - 1 then exit repeat
set n to n + 1
end repeat
else
set trimmedText to theText
end if

return trimmedText
end trim

on changeCase(thisText, thisCase)
-- 대소문자 변환 핸들러입니다. 블로그 오른쪽에 있는 링크 중 essential sub-routine에 나와있는 것입니다.
-- 1 : to upper case
-- 0 : to lower case
set the upperCases to "ABCDEFGHIJKLMNOPQRSTUVWXYZ"
set the lowerCases to "abcdefghijklmnopqrstuvwxyz"

if thisCase is 0 then
set the comparisonString to upperCases
set the sourceString to lowerCases
else
set the comparisonString to lowerCases
set the sourceString to upperCases
end if

set the newText to ""
repeat with thisChar in thisText
set x to the offset of thisChar in the comparisonString
if x is not 0 then
set the newText to (the newText & character x of the sourceString) as string
else
set the newText to (the newText & thisChar) as string
end if
end repeat

return the newText
end changeCase
2006-04-24

상호작용 마무리 : Delay, Say

delay와 say는 Standard Additions의 User Interaction 중에 아직 설명하지 못한 것들입니다. 사용법은 간단합니다.
delay 3 -- 3초 동안 스크립트 진행이 지연됩니다. 3초가 지나면 계속 진행합니다.
if (the button returned of (display dialog "2초 후에 뵙겠습니다.")) is "승인" then
delay 2
display dialog "I'm back!"
end if

say "Hello, World"
say "Hello, World" using "Kathy"

delay 다음에는 지연 시간을 초 단위의 숫자로 적어주면 됩니다. say는 영어 문장을 읽어줍니다. MacOS에는 몇가지 목소리가 포함되어있습니다. 목소리의 목록은 '시스템 환경 설정'의 '말하기'에서 확인할 수 있습니다. say로 말한 문장을 AIFF 포맷의 오디오로 저장할 수 있습니다.
say "it's 6 o'clock" saving to "Macitosh HD:Users:iPotato:Desktop:six.aiff"

2006-04-15

실습 - windows를 위한 파일 이름 확인(변경)

windows에서는 파일 이름으로 사용할 수 없는 문자가 있다고 합니다. "\", "/", "*" 같은 문자가 파일 이름에 있으면 복사가 안되는 것 같습니다. 이것들 외에 안되는 문자가 더 있는 것 같은데, 잘 모르겠네요. 더 발견되면 목록에 추가하면 될 것입니다.
droplet으로 만들어서 windows로 옮길 파일들을 drag & drop으로 떨구면 임시 폴더에 옮긴 후 해당 문자가 있는지 검사한 후에, 있으면 "_"로 바꿔주는 스크립트입니다. 혹시 동일한 이름의 파일이 임시 폴더에 이미 존재한다면 파일 이름 앞에 날짜를 붙여서 구분하게 했습니다.
on open theFiles
set theForbiddenList to {"\\", "/", "*"}
-- 기타 금지 문자들을 목록에 추가할 수 있습니다.
set cd to current date
-- 현재 시간을 지정합니다. 파일 이름이 겹칠 경우 사용하기 위해서입니다.

set theDestination to ((path to desktop folder as string) & "iPotato:")
tell application "Finder"
if theDestination exists then
else
make new folder with properties {name:"iPotato", path:path to desktop folder}
end if
end tell
-- 임시 저장 폴더를 지정하고, 없다면 만듭니다. '실습 - 이미지 크기 변경'을 참고하세요.

try
repeat with i from 1 to count of items of theFiles
set theFile to item i of theFiles
set theFileName to the name of (info for theFile)
-- 파일 이름을 가져옵니다.
set theFileNameList to every character of theFileName
-- 파일 이름의 각 문자를 list로 만듭니다. {"f", "i", "l", "e", ".", "t", "x", "t"}와 같은 형태로 만들어집니다.
set newFileName to ""
repeat with n in theFileNameList
-- n에 각 문자가 순서대로 대입됩니다.
if n is in theForbiddenList then
set newFileName to newFileName & "_"
-- 금지 문자가 있으면 "_"로 바꿉니다.
else
set newFileName to newFileName & n
end if
end repeat
set newFileName to newFileName as string
-- list 형태의 파일 이름을 문자열로 합칩니다.
tell application "Finder"
try
set newFile to duplicate theFile
-- 해당 파일을 복제한 후
set newFile to move newFile to theDestination
-- 임시 저장 폴더로 옮깁니다.
set the name of newFile to newFileName
-- 이름을 바꿉니다. 이미 같은 이름의 파일이 있다면 오류가 발생합니다.
on error errMsg number errNum
if errNum is -48 then
-- 동일한 이름의 파일이 있을 경우 -48번 오류가 발생합니다.
set prefix to (year of cd) & (month of cd as integer) & (day of cd) & (hours of cd) & (minutes of cd) & (seconds of cd) & "_" & i & "_" as string
-- 20060415123456_3_file.txt 와 같은 형태로 바꿉니다.
set the name of newFile to (prefix & newFileName) as string
end if
end try
end tell

end repeat
on error errMsg
display dialog errMsg
end try
end open

선택 (choose series)

  • choose application
  • choose color
  • choose file
  • choose file name
  • choose folder
  • choose from list
  • choose remote application
  • choose URL

choose application
응용프로그램을 선택합니다. 실행하면 응용프로그램들의 목록이 나오고, 지정한 속성에 따라 여러 프로그램을 동시에 선택할 수도 있습니다.
choose applicatioin
set myApps to choose application with multiple selections allowed
선택한 응용프로그램이 실행된다는 점을 염두에 두셔야 할 것 같습니다.

choose color
색상을 선택합니다. 색상을 선택할 수 있는 팔레트가 나오며, 선택한 색상은 R,G,B 각각 16비트로 넘어옵니다.
choose color -- 흰색이라면 {65535,65535,65535}, 검은색이라면 {0, 0, 0}


choose file
파일을 선택합니다. 한 개의 파일을 선택할 수도 있고, 여러 개의 파일을 선택할 수도 있습니다. 선택한 결과는 alias 입니다. '실습 - 이미지 크기 변경'의 예제를 참고하세요.
choose file of type {"MP3", "AAC", "MP4"} with prompt "음악파일을 고르자!"
choose file with showing package contents and invisibles -- 패키지 내용과 숨은 파일까지 볼 수 있습니다.


choose file name
파일을 만들지는 않지만, 새로운 file reference를 만듭니다. 애플스크립트로 텍스트나 이미지를 처리한 후 그 내용을 별도로 저장하고자 할 때 사용할 수 있습니다.

choose folder
폴더를 선택합니다. choose file과 유사한 속성을 갖고 있습니다.

choose from list
display dialog에서 buttons 속성을 이용하면 3개까지의 선택이 가능합니다. 3개가 넘는 선택이 필요할 때에 choose from list를 이용할 수 있습니다. shift나 command키를 이용해서 여러 개를 선택했다면 결과는 list로 넘어옵니다.
choose from list {"사과", "배", "귤", "감"} with prompt "좋아하는 과일은 무엇입니까?" with multiple selections allowed


choose remote application
원격에서 실행 중인 컴퓨터 상의 응용프로그램을 선택합니다. 여러 대의 맥을 사용 중이라면 쓸만할 것 같습니다.

choose URL
공유할 수 있는 파일 서버나, 웹서버, FTP서버 등의 URL을 선택할 수 있습니다.

실습 - 이미지 크기 변경

AppleScript 사전을 제공하는 프로그램 중에 Image Events라는 것이 있습니다. MacOS X에 기본으로 제공되는 것으로, 이미지의 크기, 방향 등을 조절할 수 있고 일부분을 오려낼 수도 있습니다. '미리보기(Preview)'에서 제공하는 이미지 편집 기능과 거의 유사하다고 볼 수 있으며, 이런 기능을 AppleScript로 제어할 수 있습니다.

여러 장의 사진의 크기를 한꺼번에 조절하는 스크립트를 만들어보겠습니다. Photoshop의 Action으로도 가능할 것 같고, 이런 기능을 제공하는 이미지 처리 전용 프로그램들이 많이 나와있습니다만, AppleScript를 공부하는 차원에서 한 번 만들어보았습니다.

원래 의도는 droplet으로 만들고, 크기와 기준 방향을 파일 이름을 바꿈으로써 결정할 수 있게 하려고 했습니다. 데스크탑에 위치시키고 이미지들을 drag & drop함으로써 일괄적으로 변경할 수 있으며, 환경설정 파일을 따로 만들지 않고 프로그램 이름을 'w400', 'h300', 'r50' 등으로 바꾸는 것으로 환경설정을 대신하려고 했습니다. 그런데 어떤 이유에서인지 제 실행환경에서는 정상적으로 작동하질 않더군요. 이 문서 마지막에 droplet으로 만드는 방법을 다시 설명하겠습니다. 어쨌든 droplet이 아닌 응용프로그램으로 만드는 스크립트를 소개합니다. 만약 'theImage가 설정되지 않았다'는 내용의 오류가 발생한다면 스크립트 편집기로 열어서, 하단의 3개의 버튼 중 '이벤트 로그'를 눌러준 후에 실행해보십시오.

set the theFiles to choose file with multiple selections allowed 
-- 여러 개의 파일을 선택할 수 있는 옵션을 주었습니다.
set theMethod to "w"
-- 기준 방향입니다. 가로 기준이면 w, 세로 기준이면 h, 비율이라면 r입니다.
set theValue to 400
-- 변경할 수치입니다. w와 h의 경우 단위는 픽셀이며, r의 경우에는 %입니다.
set theDestination to ((path to desktop folder as string) & "iPotato")
-- 변경된 이미지 파일이 저장될 장소입니다. 아직까지는 실제 존재하는 경로가 아닙니다.

tell application "Finder"
-- Finder를 이용해서 저장 경로를 확인합니다.
if theDestination exists then
-- 상기 경로가 존재한다면 그냥 넘어갑니다.
else
-- 존재하지 않는다면, 이를테면 이 스크립트를 처음으로 실행한다면
make new folder with properties {name:"iPotato", path:path to desktop folder}
-- 폴더를 만듭니다. 파인더에 대해서 설명하는 문서를 따로 만들 생각입니다.
end if
end tell

repeat with theFile in theFiles
-- 위에서 선택한 파일들은 list로 넘어옵니다. theFile에 하나씩 할당하면서 반복처리합니다.
tell application "Image Events"
set theImage to open theFile
-- 파일을 image 형태로 바꿉니다.
set theFileType to the file type of theImage
-- 이미지 파일이라면 jpeg, png, gif 등의 파일 타입을 갖고 있습니다.
if theFileType is not "" then
-- 파일 타입이 없다면 이미지 파일이 아닌 것으로 간주합니다.
set theWidth to the item 1 of (the dimensions of theImage as list) as integer
-- 가로 크기를 구하고
set theHeight to the item 2 of (the dimensions of theImage as list) as integer
-- 세로 크기를 구합니다.
if theMethod is "w" then
set newImage to scale theImage to size theValue
-- 가로를 기준으로 변경합니다.
else if theMethod is "h" then
set newImage to scale theImage to size (((theWidth * theValue) / theHeight) as integer)
-- 세로를 기준으로 변경합니다.
else if theMethod is "r" then
set newImage to scale theImage by factor (theValue / 100)
-- 비율로 변경합니다.
end if
save newImage in theDestination -- 저장합니다.
end if
end tell
end repeat


droplet으로 만드는 스크립트는 다음과 같습니다.
on open theFiles
set myName to name of (info for (path to me))
-- 프로그램의 이름을 불러옵니다. 'w400.app', 'r70.app' 등의 형태로 불러오게 됩니다.
set theMethod to first character of myName
-- 첫번째 글자가 변경 기준입니다.
set theValue to (((characters 2 thru (((count of characters of myName) as integer) - 4)) of myName) as string) as integer
-- 두번째 글자부터 마지막 4글자(.app)를 제외한 나머지를 불러옵니다. 그냥 불러오면 {"4", "0", "0"}과 같이 list로 넘어오기 때문에 글자로 합쳐주기 위해 as string을 붙입니다. 그러면 "400"이 되고, 다시 숫자로 바꾸기 위해 as integer를 붙여주면 400이 됩니다.
set theDestination to ((path to desktop folder as string) & "iPotato")
-- 이후에는 위의 응용프로그램용 스크립트와 똑같습니다.

tell application "Finder"
if theDestination exists then
else
make new folder with properties {name:"iPotato", path:path to desktop folder}
end if
end tell

repeat with theFile in theFiles
tell application "Image Events"
set theImage to open theFile
set theFileType to the file type of theImage
if theFileType is not "" then
set theWidth to the item 1 of (the dimensions of theImage as list)
set theHeight to the item 2 of (the dimensions of theImage as list)
if theMethod is "w" then
set newImage to scale theImage to size theValue
else if theMethod is "h" then
set newImage to scale theImage to size (((theWidth * theValue) / theHeight) as integer)
else if theMethod is "r" then
set newImage to scale theImage by factor (theValue / 100)
end if
save newImage in theDestination
end if
end tell
end repeat
end open
on open으로 시작하고, 자기 이름을 불러들여 변경 기준과 수치를 읽어들이는 부분이 있습니다.
droplet으로 잘 작동하는 비결을 알고계신 분은 답글이나 메일로 알려주시기 바랍니다.

2006-04-14

응용프로그램으로 저장

스크립트 편집기 상에서가 아니라, MacOS의 응용프로그램으로서 동작하도록 만들 수 있습니다. 다양한 기능을 수행하도록 작성한 스크립트를 매번 스크립트 편집기에서 연 후에 작동하는 것이 번거롭기도 하고, 다른 사람들에게 배포하는 데에도 문제가 있을 수 있습니다.
방법은 간단합니다. 스크립트를 저장할 때 포맷을 응용프로그램으로 지정해서 저장하면 됩니다. 다만 응용프로그램으로 만들 때 두 가지 선택이 가능한데, 이 부분이 제대로 설명된 것 같지 않습니다. 일반적인 응용프로그램은 더블 클릭으로 실행되고 지정된 동작들이 실행됩니다. 그런데, 지정된 동작에 있어서 파인더의 폴더 아이템(파일, 파일들 혹은 폴더)이 필요한 경우가 있습니다. choose file이나 choose folder를 이용해서 불러올 수는 있지만, drag & drop으로 간단히 해결할 수 있는 방법이 있습니다. 아래의 두 예제를 참고하세요.

Application
on run
display dialog "I'm alive"
end run

Droplet
on open theFile
tell application "Finder"
duplicate theFile
end tell
end open


스크립트가 시작할 때에는 on run이라는 handler부터 실행됩니다만, on run이 없을 경우 스크립트의 처음부터 실행되는 것 같습니다. on open으로 시작한 스크립트를 응용프로그램으로 저장하면 아이콘이 약간 다른 것을 알 수 있습니다. 아이콘에 화살표가 나타나는데, 아이콘 위에 파일 1개 혹은 여러 개를 drag & drop 하면 같은 경로 상에 그 파일(들)이 복제됩니다.

함수 (handler)

다른 많은 프로그래밍 언어처럼, 애플스크립트 역시 handler라는 함수 형태를 지원합니다. 적절한 우리 말로는 그냥 핸들러라고 해야할지, 함수라고 해야할지는 잘 모르겠습니다.
handler는
on [handler name]()
return [return value]
end [handler name]
의 형태를 갖습니다. ()안에는 적당한 매개변수가 들어갑니다. 처리 결과는 return 으로 반환합니다. handler를 실행할 때에는 my를 이용합니다. 구구한 설명보다 예제를 보는 것이 훨씬 도움이 될 것 같습니다.
-- 원의 넓이 구하기
set radius to 3
set theAreaOfCircle to getAreaWith(radius)

on getAreaWith(radius)
return (radius * radius * pi)
end getAreaWith
-- 숫자의 자릿수 맞추기(adding leading zeros)
display dialog "4자리 숫자로 만듭니다. 10000보다 작은 아무 숫자나 넣으세요." default answer ""
set theNumber to my addZerosTo(text returned of the result)

on addZerosTo(theValue)
set theSize to the count of characters of theValue
if theSize is 1 then
return ("000" & theValue) as string
else if theSize is 2 then
return ("00" & theValue) as string
else if theSize is 3 then
return ("0" & theValue) as string
else if theSize is 4 then
return theValue
else
display dialog "너무 큰 숫자입니다."
end if
end addZerosTo

다른 프로그래밍 언어라면 바로 위의 예제는 컴파일이 불가능할 것입니다. 마지막 if에서는 return이 없기 때문입니다. 이런 유연함 혹은 융통성이 애플스크립트의 장점이자 단점인 것 같습니다.
handler를 이용하면 훨씬 더 이해하기 편한 스크립트를 만들 수 있습니다. 길이도 짧아지고, 덜 복잡해보일 수 있습니다.


변수의 범위에 대해서 따로 쓸 기회가 있을지는 잘 모르겠습니다.
set apple to 1  -- apple: 1
set apple to eat() -- apple: 2

on eat()
get apple -- 오류가 발생합니다.
--set apple to 3 -- 위의 apple과는 다른 apple입니다.
return 2
end eat

스크립트의 첫째줄에서 apple이라는 변수를 만들었습니다. 그렇지만 eat()이라는 handler안에서 apple이라는 변수의 값을 요구하면 오류가 발생합니다. handler 안에서는 apple이라는 변수를 만든 적이 없기 때문입니다. handler 안에서 외부의 변수를 사용하고자 할 때에는 매개변수로서 handler에 전달되던가, 미리 그 변수를 전역변수로 만들어야 합니다.
set apple to 1
set apple to eat(apple)
on eat(apple)
set apple to 2
return apple
end eat
set apple to 1
global apple
my eat()

on eat()
get apple -- apple: 1
end eat
좀 더 정리된 문서를 올리도록 노력하겠습니다.

문자 비교(Considering, Ignoring)

ignoring의 경우 제 스크립트 편집기가 비정상적으로 종료되어버립니다. 2바이트 언어 처리에 문제가 있는 것으로 보입니다.
대소문자, 특수문자, 공백 등을 고려하거나 무시해서 문자를 비교하고 그 결과를 참, 거짓으로 알려주는 명령어입니다. 한글 지원이 잘 되고, 잘 사용할 수 있다면 검색 결과를 풍부하게 만들 수 있으리라 기대됩니다.
application responses
case대문자와 소문자
diacriticals ´, `, ^, ¨,~
"résumé" vs "resume"
expansionæ, Æ, etc.
hyphens"anti-war" vs "antiwar"
punctuations. , ? : ; ! \ ' "
white space문자 사이의 공백
적용되는 옵션들

ignoring case
"white rabbit" = "White Rabbit"
end ignoring
-- true

2006-04-13

파일 처리(file)

AppleScript로 파일 내용을 읽거나, 파일을 만들 수 있습니다. 파일의 전체 혹은 일부를 읽을 수 있고, 새로 작성하거나 가공한 내용으로 파일을 작성할 수 있습니다.
파일의 경로를 직접 입력하거나 choose file을 이용해서 파일의 경로를 지정할 수 있습니다. Standard Additions의 사전에 read와 write에서 사용할 수 있는 옵션들이 기재되어있습니다.

파일 읽기
try
set theFile to choose file
set theOpenFile to open for access theFile
read theOpenFile
on error errMsg number errNum
get errNum & " : " & errMsg
end try
try
set theFile to "Macintosh HD:Users:iPotato:Documents:sample.txt"
set theOpenFile to open for access theFile
read theOpenFile from 100 to 300
on error errMsg number errNum
display dialog (errNum as string) & " : " & (errMsg as string)
end try
try
set theFile to "Macintosh HD:Users:iPotato:Documents:sample.html"
set theOpenFile to open for access theFile
read theOpenFile using delimiter "<"
close access theFile
on error errMsg number errNum
display dialog (errNum as string) & " : " & (errMsg as string)
end try


파일 쓰기
try
set theFile to path to desktop
set theFileName to (theFile & "testfile.txt") as string
set theOpenFile to open for access theFileName with write permission
write "Hello, World!" to theOpenFile

read (open for access theFileName)
on error errMsg number errNum
get errNum & " : " & errMsg
end try

open for access명령에 with write permission이라는 매개변수가 반드시 포함되어야 합니다. 그렇지 않으면 파일을 작성할 수 있는 권한을 부여받지 못했기 때문에 오류가 발생합니다.

오류 대응(try)

try
set A to "apple"
set B to "orange"
set C to A / B
on error errMsg number errNum
errNum & errMsg
end try

위의 예제는 두 개의 문장에 나눗셈을 적용시켜서 오류가 발생하도록 유도한 것입니다. 에러의 결과는 아래 그림과 같습니다. 문자는 정수(integer)나 실수(real)와 같은 숫자가 아니기 때문에 나눗셈 연산을 적용할 수 없습니다.
try 안에서 오류가 발생하면 on error로 넘어갑니다. 오류의 내용은 errMsg라는 변수에 담았습니다. 각각의 오류에는 고유한 번호가 있는데, 그 번호는 errNum에 담았습니다. 오류의 내용과 번호에 따라서 적절한 대응을 해줄 수 있는 스크립트를 작성하면 됩니다.

Operating System Errors
Apple Event Errors
Application Scripting Errors
AppleScript Errors

반복(repeat ~ end repeat)

repeat부터 end repeat까지 사이에 있는 스크립트를 반복해서 수행합니다. 특별한 조건이 없으면 무한정 반복합니다. 스크립트 에디터에서는 '중단' 버튼을 눌러서 멈출 수 있습니다. 스크립트를 응용프로그램으로 만들 때에는 무한 루프를 만들지 않도록 신경쓰셔야 합니다.
repeat
beep
end repeat


10번 실행하고 멈추는 스크립트들입니다.
set i to 1
repeat
beep
set i to i + 1
if i > 10 then exit
end repeat
repeat with i from 1 to 10
display dialog i
end repeat
repeat 10 times
display dialog "ha ha ha"
end repeat


repeat의 종류
  • repeat : 무한정 반복합니다. 사용자가 직접 멈추거나, 멈출 수 있는 조건을 만들어야 합니다.
  • repeat n times : n번 반복합니다.
  • repeat while : while 이후의 조건이 참인 동안 반복합니다.
  • repeat until : until 이후의 조건이 참인 동안 반복합니다.
  • repeat with A from B to C by D: A가 B에서부터 C까지 증가하는 만큼 반복합니다. 증가하는 단위는 by로 결정합니다.
  • repeat with X in {} : count of {} 만큼 반복합니다. 반복되는 동안 X에는 list의 아이템이 하나씩 대응됩니다.


repeat에서 빠져나올 때에는 exit를 사용합니다.
set x to 0
repeat
set x to x + 1
if x > 10 then
exit repeat
end if
end repeat


1부터 10까지의 합을 구하는 스크립트입니다.
set r to 0
repeat with i from 1 to 10
set r to r + i
end repeat
r

2006-04-11

실습 - 로또 번호 뽑기

간단하게 만들어볼 수 있고, 유용한(?) 사례입니다.
우선, 1부터 45까지의 숫자 중 중복되지 않은 7개의 숫자를 뽑는 경우를 충실하게 재현한 방식입니다.
-- 1부터 45까지의 숫자 중 보너스 번호를 포함해서 7개의 중복되지 않은 숫자를 골라냅니다.
property theBasket : {} as list
property theChosenBalls : {} as list

set theBasket to my fillBasket()
set theBalls to my chooseBalls()

-- 1부터 45까지의 번호를 바구니에 채웁니다.
on fillBasket()
repeat with i from 1 to 45
set theBasket to theBasket & i
end repeat
end fillBasket

-- 보너스번호를 포함해서 7개의 번호를 뽑습니다.
on chooseBalls()
repeat with n from 1 to 7
-- 남아있는 번호 중 하나를 뽑습니다.
set theChosenBall to item (random number from 1 to (count of theBasket)) of theBasket
set theChosenBalls to theChosenBalls & theChosenBall
-- 뽑은 번호를 다시 뽑지 않도록 제거합니다.
my remove(theChosenBall)
end repeat

-- 뽑은 결과를 정리합니다.
my processResult()
end chooseBalls

-- 뽑은 번호를 제거하는 서브루틴입니다.
-- 남은 번호들과 뽑힌 번호를 비교해서, 다른 경우에는 다시 바구니에 넣습니다.
on remove(theChosenBall)
-- 임시 바구니를 만들어 모두 옮깁니다.
set newBasket to theBasket
-- 바구니를 비웁니다. 비교하면서 뽑힌 번호가 아니면 바구니에 채웁니다.
set theBasket to {}

-- 임시바구니에서 번호를 하나씩 꺼내서 뽑힌 번호와 비교합니다.
repeat with m from 1 to (count of newBasket)
-- 뽑힌 번호와 같지 않으면 바구니에 다시 넣습니다.
if (item m of newBasket) is not theChosenBall then
set theBasket to theBasket & (item m of newBasket)
end if
end repeat
end remove

on processResult()
set the result to "Here are the numbers. " & return
set the result to the result & "1st : " & item 1 of theChosenBalls & return
set the result to the result & "2nd : " & item 2 of theChosenBalls & return
set the result to the result & "3rd : " & item 3 of theChosenBalls & return
set the result to the result & "4th : " & item 4 of theChosenBalls & return
set the result to the result & "5th : " & item 5 of theChosenBalls & return
set the result to the result & "6th : " & item 6 of theChosenBalls & return
set the result to the result & "bonus : " & item 7 of theChosenBalls & return
end processResult


몇가지 핸들러도 사용하고 복잡해보이지만, AppleScript에는 contains라는 명령어가 있습니다. list에 들어있는 item이라면 true를 반환하는 명령어입니다. contains를 사용해서 간략하게 줄여보겠습니다. 1부터 45까지의 숫자에서 하나씩 뽑아내고, 이미 들어있다면 다시 뽑는 방식입니다. 위의 예제보다 훨씬 짧습니다.
set theBasket to {}

set i to 0
repeat
set theBall to random number from 1 to 45

if theBasket does not contain theBall then
set theBasket to theBasket & theBall
set i to i + 1
end if

if i >= 7 then exit repeat
end repeat

get theBasket --get은 생략 가능

2006-04-08

조건 (if then)


if 2 > 1 then display dialog "it's true"


set myNumber to 100
set yourNumber to 50
if myNumber is greater than yourNumber then
beep
display dialog "My number is greater than yours!"
else
display dialog "Your number is greater than mine!"
end if

조건이 참인지 거짓인지는 if를 이용해 비교함으로써 알 수 있고, 그에 따른 처리는 then을 이용합니다.

비교와 그에 따른 처리가 끝나면 end if로 끝맺음해줍니다. tell ~ end tell에서와 마찬가지로, 1줄로 끝날 경우에는 end if를 쓰지 않을 수 있습니다.


set theNumber to 77
if theNumber is less than 10 then
display dialog "10보다 작군요."
else if theNumber >= 10 and theNumber is less than 100 then
display dialog "2자리 숫자군요."
else if theNumber is equal to 100 then
display dialog "100이군요."
else if theNumber is greater than 100 then
display dialog "100보다 큰 숫자는 몰라요."
end if

참, 거짓으로만 나눠지지 않는 경우도 있습니다. 그럴 때에는 else if를 여러번 사용해서 모든 경우에 대비할 수 있습니다.


set myNumber to (text returned of (display dialog "아무 숫자나 넣으세요." default answer "")) as integer

if myNumber < 1000 then
if myNumber < 100 then
if myNumber < 10 then
display dialog "10보다 작군요."
else
display dialog "100보다 작군요."
end if
else
display dialog "1000보다 작군요."
end if
else
display dialog "1000보다 크거나 같군요."
end if

if는 여러 번 중첩해서 사용할 수 있습니다. 단, 이 경우에는 비교에 사용된 논리가 정확하지 않으면 스크립트의 결과가 의도한 대로 나오지 않을 수 있으니 주의해야 합니다.


작다작거나 같다같다크거나 같다크다다르다. 같지 않다.
A is less than B
A < B
A <= B
A is less than or equal to B
A is not greater than B
A is equal to B
A equals B
A = B
A >= B
A is greater than or equal to B
A is not less than B
A is greater than B
A > B
A is not B
비교하기 위한 다양한 방법들

상호작용 (display dialog, display alert)

display dialog

display dialog "Hello, Wolrd!"

display dialog는 메세지를 전달하고, 그에 대한 대답을 받을 수 있습니다.


여기서 설명하지 않은 속성들은 Standart Additions의 사전을 참고하세요.
set theResult to text returned of (display dialog "enter a word" default answer "")
display dialog "you entered \"" & theResult & "\""

default answer를 이용하면 사용자로부터 문장이나 숫자를 대답으로 받을 수도 있습니다.
set favoriteFruit to display dialog "which is your favorite?" buttons {"apple", "orange", "mango"} default button "apple"
display dialog "your favorite fruit is " & button returned of favoriteFruit & "!"

set favoriteCar to button returned of (display dialog "which is your car?" buttons {"sonata", "matiz", "bmw"} default button 2)
display dialog "your favorite car is " & favoriteCar & "!"

buttons을 이용하면 다양한 선택을 제공할 수 있습니다. 안타깝게도 dialog box에서는 버튼을 최대 3개까지만 지원합니다. 4개 이상의 선택이 필요하다면 choose from list를 이용하거나, XCode를 이용해 GUI를 구현해야 합니다. default button은 숫자나 버튼 이름으로 지정할 수 있습니다.
display dialog "stop!" with icon 1
display dialog "notice" with icon note
dialog box에 icon을 삽입할 수 있습니다. stop, note, caution 3가지 icon을 지원하며, icon 이름 대신 번호로 지칭할 수 있습니다.
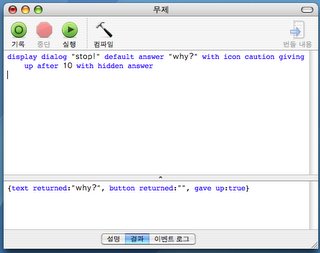
display dialog "stop!" default answer "why?" with icon caution giving up after 10 with hidden answer


display alert

display dialog는 사용자에게 승인과 취소라는 두 가지 선택을 주지만, display alert은 그저 사용자에게 통보만 할 뿐입니다. 그렇지만 buttons라는 속성을 이용하면 display dialog와 마찬가지로 최대 3개까지의 버튼을 만들 수 있습니다.
display alert "critical alert!!" message "심각한 문제가 발생했습니다!" as critical buttons {"탈출", "자폭", "해결책"} default button 1 cancel button "자폭"

상수 (Constants)

AppleScript에서 사용하도록 정해진 단어들입니다. 각각 의미를 갖고 있으며, 사용자가 변수 이름이나 핸들러 이름으로 사용할 수 없습니다.

Arithmaticpi, minutes, hours, days, weeks
Booleantrue, false, equals, grater than, less than
Considering and Ignoringapplication responses, case, diacriticals, expansion, hyphens, punctuation, white space
Date and Timeminutes, hours, days, weeks, Monday, Tuesday, Wednesday, Thursday, Friday, Saturday, Sunday, Mon, Tue, Wed, Thu, Fri, Sat, Sun, January, February, March, April, May, June, July, August, September, October, November, December, Jan, Feb, Mar, Apr, May, Jun, Jul, Aug, Sep, Oct, Nov, Dec
Miscellaneousanything, current application, missing value, result
Save Optionyes, no, ask
Stringreturn, tab, space
Text Styleall caps, all lowercase, bold, condensed, expanded, hidden, italic, outline, plain, shadow, small caps, strikethrough, subscript, superscript, underline
Versionversion
Tellit, me, my

변수(variables)


set myRace to "Human"

set yourRace to "Klingon" as string

copy "Romulan" to hisRace

set myNumber to 100
get myNumber

set myNumberText to 100 as text

set yourFloat to 3.141592
yourFloat

set myList to {"Human", "Klingon", "Vulcan"}

set myRecord to {race: "Human", age: 30, gender: "male"}

변수를 지정할 때에는 set과 copy를 이용합니다. set과 copy는 똑같은 역할을 하지만 방향이 정반대입니다. 변수가 갖고 있는 값을 꺼낼 때에는 get을 이용합니다. 그렇지만 스크립트편집기에서는 get를 생략한 채 변수 이름만 적을 경우에 결과창에 호출된 변수의 값이 표시됩니다.
AppleScript의 data class(type)는 Java나 PHP에서의 그것과는 좀 다릅니다.


변수의 유형설명
Boolean논리에 의한 참, 거짓
ClassA class identifier
Constant응용프로그램이나 AppleScript에서 지정한 값, 상수
Data원시 데이터. AppleScript에서 표현할 수는 없지만 변수의 값으로서 저장할 수는 있음
Date날짜와 시간
File Specification파일의 이름과 경로. 아직 생성되지 않아 실제로 존재하지 않는 파일의 정보를 가질 수도 있음
Integer정수. 음의 정수, 0, 양의 정수(자연수)로 이루어지고, 소수점이 붙지 않음
International TextCharacter data in the form of international text
List순서를 갖춘 변수의 집합
Number정수, 실수와 같은 용도
Real실수
Record속성의 집합
ReferenceA reference to an object
RGB Color색상을 구성하는 빨간색(red), 녹색(green), 파란색(blue)의 정수값의 집합
String문자열, 문장
Styled Clipboard Text클립보드에 저장된 문자. 스타일과 폰트 정보가 포함됨
Styled Text스타일과 폰트 정보가 포함된 문자
TextString과 같음
Unicode TextCharacter data in the form of Unicode (2-byte) text
Unit Type Value Classes길이, 면적, 체적, 용량, 부피, 기온 등 도량형 단위
AppleScript에서 사용할 수 있는 data의 유형


current date
month of (current date)


set myNumber to 1
set yourNumber to 2
myNumber + yourNumber
-- 3

set myText to " year"
(myNumber as string) & myText
-- 1 year


set theKM to 1 as kilometers
set theMile to theKM as miles
get theMile


set theKG to 100 as kilograms
set thePound to theKG as pounds
get thePound


길이넓이부피용량무게온도
centimetres
centimeters
feet
inches
kilometres
kilometers
metres
meters
miles
yards
square feet
square kilometres
square kilometers
square metres
square meters
square miles
square yards
cubic centimetres
cubic centimeters
cubic feet
cubic inches
cubic metres
cubic meters
cubic yards
gallons
litres
liters
quarts
grams
kilograms
ounces
pounds
degrees Celsius
degrees Fahrenheit
degrees Kelvin
AppleScript에서 제공하는 도량형 단위

기본개념 - 문법 규칙, 연산 등

  • tell ~ and tell
  • of, ()
  • ""
  • 주석
  • 연산(&, +, -, *, /, ^, mod)
tell ~ end tell
AppleScript로 제어가 가능한(scriptable) 응용프로그램에게 일을 시키기 위해서 tell을 사용합니다.
tell application "Finder"
make new Finder window
end tell
tell application "Finder" to make new Finder window
위의 두 예제는 동일한 기능을 수행합니다. Finder에게 시킬 일이 딱 한 가지 뿐이라면 end tell로 끝맺지 않고 간단히 한 줄로 처리할 수 있습니다. 시킬 일이 많다면 한 줄로 처리하기 곤란하겠지요. 다음 예제를 참고하세요.
tell application "Finder"
tell process "Finder"
set frontmost to true
display dialog "Finder's file type is " & file type
end tell
end tell
tell application "Safari"
tell document 1
set URL to "http://www.apple.com"
end tell
end tell

tell document 1 of application "Safari"
set URL to "http://www.apple.com"
end tell
of, ()
object의 하위 항목을 지칭하고자 할 때에는 of를 사용합니다.
hours of (current date)
text returned of (display dialog "enter a word" default answer "")
XCode를 이용해서 GUI를 갖춘 AppleScript 응용프로그램을 만들고자 할 때에도 of를 많이 사용하게 됩니다.
먼저 처리해야 할 부분, 혹은 다른 스크립트와 섞여 사용할 때 혼동할 우려가 있는 부분은 ()로 감싸줍니다. current date를 ()로 감싸주지 않으면 속성값을 뽑아낼 때 오류가 발생합니다.
set the title of window "Main" to "My First App"
set the value of gauge "myGauge" of window "Main" to 5
따옴표("")
따옴표("")로 감싸면 AppleScript에서는 문자 데이터로 취급합니다. 문자를 나타내는 기호가 아닌 경우에 따옴표를 이용하기 위해서는 "\""와 같이 사용합니다. 아래 예제를 실행시켜보는 것이 구질구질한 설명을 이해하는 것보다 훨씬 더 낫습니다.
display dialog "He said, \"Live long and prosper.\""
주석
tell application "Finder"
make new finder window --새로운 파인더 윈도우를 만듭니다.
end tell
(*
이 주석은 여러 줄에 걸쳐 있습니다.
여러 줄을 한꺼번에 주석처리할 때 사용합니다.
*)
display dialog "enter a word" default answer "" -- 사용자가 입력할 수 있습니다.
&, +, -, *, /, ^, mod
set myFruit to "apple"
set yourFruit to "orange"
set hisFruit to "mango"

myFruit & space & yourFruit & return & hisFruit
(1 + 2)^2 * 2 / 3
100 mod 3    -- 100을 3으로 나눈 나머지는 1
set myResult to ""
repeat with i from 1 to 10
if (i mod 2) = 0 then
set yourResult to i & " : 짝수" & return
else
set yourResult to i & " : 홀수" & return
end if
set myResult to myResult & yourResult
end repeat
문자를 합칠 때에는 &를 사용합니다.
사칙연산과 제곱 기호는 다른 프로그래밍언어와 비슷합니다.
mod는 나눗셈을 하고 난 나머지만을 구해주는 기능을 합니다.

AppleScript 사전

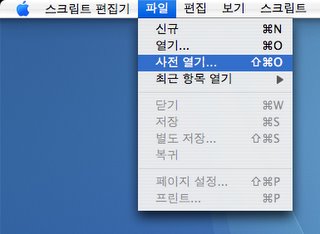
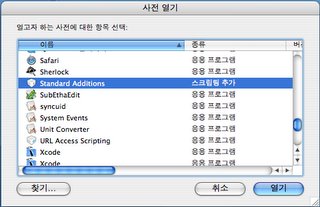
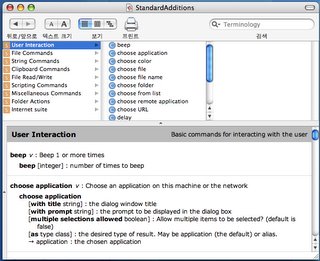
AppleScript로 Scripting할 수 있는 프로그램들은 사전(Dictionary)을 갖고 있습니다. 그리고 AppleScript의 기초적인 기능을 구현해주는 Scripting Additions 역시 사전을 갖고 있으며, 초보자들에게는 아주 유용한 도구입니다. 다만 RealBasic의 Language Reference와는 달리 예제나 샘플코드는 전혀 들어있지 않아서 사전을 이용하는 데에 어려움을 겪을 수도 있습니다.


P와 E라는 아이콘이 있는데, P는 속성(property)이고, E는 요소(element)입니다. 예를 들어보겠습니다.
set theList to {"apple", "orange", "melon"}

count of theList
-- 3

item 1 of theList
-- "apple"

여기서 아이템의 갯수는 3개입니다. 이런 것이 속성(property)입니다. 그리고 첫번째 아이템은 "apple"입니다. 이것이 theList의 요소(element)입니다.

스크립트 편집기(Script Editor)

스트립트 편집기를 이용하는 것이 AppleScript를 체험해볼 수 있는 가장 효과적인 방법입니다. 사실 전문적인 프로그래밍 도구인 XCode를 이용하지 않는다면 스크립트 편집기가 거의 유일한 대안이기도 합니다. MacOS X을 설치하면 '응용 프로그램(Applications)' 폴더에 'AppleScript'라는 폴더가 있는데, 그 안에 '스크립트 편집기(Script Editor)'가 있습니다.


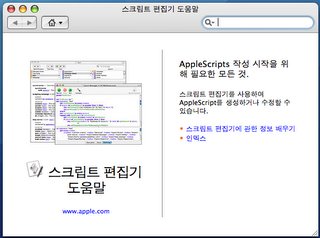
스크립트 편집기의 도움말을 읽어보는 것 역시 꽤 도움이 될 것입니다.


스크립트 편집기의 도움말을 실행시킨 모습


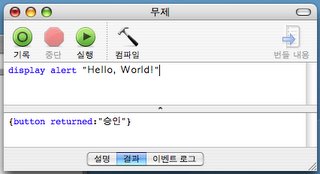
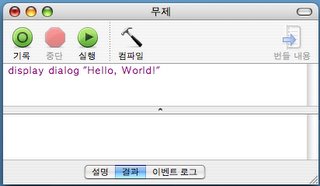
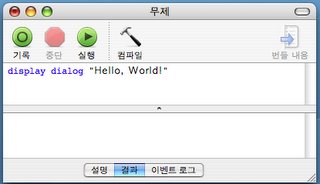
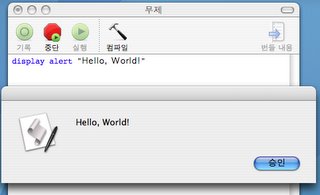
간단한 스크립트를 작성해보겠습니다. 아래 그림 처럼 유명한 예제를 실습해보겠습니다. 그림에 나온 대로 입력해보세요.


'컴파일' 버튼을 누르면 문법에 맞춰서 색깔을 입혀줍니다. 뭔가 그럴싸한 코딩을 한 느낌을 줍니다.


'실행' 버튼을 누르면 스크립트가 실행됩니다. 한 번 눌러보세요.

AppleScript란?


프로그래밍에 대한 전문적인 지식을 갖고 있지 못한 제 경험에 비추어 봤을 때, AppleScript는
  • 단순 반복 작업을 줄여줍니다.
  • 문법이 일상 영어와 비슷해서 (영어를 쓸 수 있는) 초보자가 처음 접했을 때 그다지 어렵지 않다는 생각을 가질 수 있습니다. 그렇지만 코드가 길어지면 조금 난잡하다고 느껴질 수도 있습니다.
  • 객체지향(object oriented)언어의 성격을 갖고 있다고 합니다.
AppleScript에 관한 자료는, 다른 프로그래밍언어와의 비교가 성립할지는 잘 모르겠습니다만, 정말 부족한 편입니다. 저 역시 예전에 성안당에서 출판된 적이 있는 AppleScript 서적을 통해 많은 것을 배웠고, 이후에는 외국의 AppleScript 관련 웹사이트를 전전하며 어깨너머로 조금씩 배운 것이 전부입니다. 제가 만들고 있는 이 사이트 역시 자료의 부족과 제 게으름으로 말미암아 Apple의 개발자 페이지에서 제공하는 AppleScript Language Reference를 전적으로 참고하고 있습니다. 그렇지만 Apple에서 제공하는 Language Refernece는 AppleScript 1.3.7 버전을 기준으로 작성되었기 때문에 (현재 버전은 1.10.x 입니다.), 새로 추가된 유용한 기능들이 많이 누락되어 있습니다. 물론 다른 페이지에서 잘 설명하고 있지만 초보자가 찾아다니면서 보기에는 어려움이 약간 있을 것입니다.
이 사이트의 문법 설명은 주로 MacOS X 10.4와 함께 제공된 스크립트 편집기를 이용할 것입니다.

2006-04-06

AppleScript를 배웁시다.

함께 공부했으면 좋겠습니다.